Quick Menu
- Предварительные условия
- Вступление
- Install Debian 11
- Prevent WSL from tweaking configuration files
- Force the use of iptables-legacy
- Install Systemd
- Install YunoHost
- Backup and restore the distro
- Proceed with the initial configuration
- Run the initial diagnosis
- Get a Let's Encrypt certificate
- Congratz!
Установка YunoHost
Выберите оборудование, на которое вы хотите установить YunoHost :

Эта настройка в основном предназначена для локального тестирования продвинутыми пользователями. Из-за ограничений на стороне WSL (в частности, изменение IP-адреса) самостоятельный хостинг с него может быть сложным и здесь описываться не будет.
Предварительные условия
Вступление
WSL is a nice feature of Windows 10, making Linux pseudo-distributions available through command line. Let's say pseudo, because even though they are not really like virtual machines, they rely on virtualization capacities that make their integration with Windows almost seamless. Docker for Windows can now rely on WSL instead of Hyper-V, for example.
Bear in mind, this setup itself is not a container of any kind. If something breaks, there is no rollback capability. You may need to delete the Debian distro altogether and restore it whole.
Install Debian 11
Let's install YunoHost into its own distro, not altering the default one. In a PowerShell terminal:
# Let's go in your home directory and prepare the working directories
cd ~
mkdir -p WSL\YunoHost
# Download the Debian appx package and unzip it
curl.exe -L -o debian.zip https://aka.ms/wsl-debian-gnulinux
Expand-Archive .\debian.zip -DestinationPath .\debian
# Import the Debian base into a new distro
wsl --import YunoHost ~\WSL\YunoHost ~\debian\install.tar.gz --version 2
# Cleanup
rmdir .\debian -R
You can now access it: run wsl.exe -d YunoHost
It is under Debian 9 Stretch, so let's upgrade it:
# In WSL
sudo sed -i 's/stretch/bullseye/g' /etc/apt/sources.list`
sudo apt update
sudo apt upgrade
sudo apt dist-upgrade
Prevent WSL from tweaking configuration files
Edit /etc/wsl.conf and put the following code in it:
[network]
generateHosts = false
generateResolvConf = false
Force the use of iptables-legacy
Somehow the YunoHost post-installation does not like nf_tables, the new software replacing iptables.
We can still explicitely use the good ol' iptables though:
# In WSL
sudo update-alternatives --set iptables /usr/sbin/iptables-legacy
sudo update-alternatives --set ip6tables /usr/sbin/ip6tables-legacy
Install Systemd
Debian on WSL does not have systemd, a service configuration software.
This is a key element for YunoHost, and for any decent Debian distro (seriously MS, what the heck). Let's install it:
- Install dotNET runtime:
# In WSL
wget https://packages.microsoft.com/config/debian/11/packages-microsoft-prod.deb -O packages-microsoft-prod.deb
sudo dpkg -i packages-microsoft-prod.deb
sudo apt update
sudo apt install -y apt-transport-https
sudo apt update
sudo apt install -y dotnet-sdk-3.1- Install Genie:
# In WSL
# Add their repository
echo "deb [trusted=yes] https://wsl-translinux.arkane-systems.net/apt/ /" > /etc/apt/sources.list.d/wsl-translinux.list
# Install Genie
sudo apt update
sudo apt install -y systemd-genie
Install YunoHost
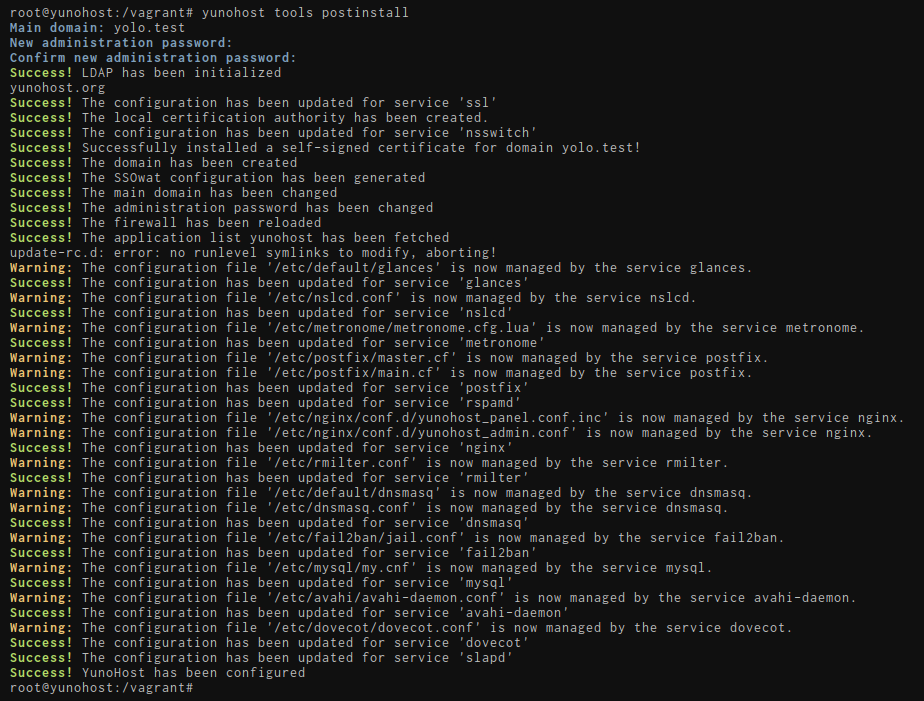
# In WSL
# Let's switch to the root user, if you were not already
sudo su
# Initialize the Genie bottle to have systemd running
genie -s
# Your hostname should have been appended with "-wsl"
# Install YunoHost
curl https://install.yunohost.org | bash -s -- -a
Access the command line
Always call genie -s while starting your distro.
wsl -d YunoHost -e genie -s
Backup and restore the distro
Make your first distro backup
As said before, there is no rollback capability. So let's export your fresh distro. In PowerShell:
cd ~
wsl --export YunoHost .\WSL\YunoHost.tar.gz
In case of crash, delete and restore the whole distro
cd ~
wsl --unregister YunoHost
wsl --import YunoHost .\WSL\YunoHost .\WSL\YunoHost.tar.gz --version 2
Proceed with the initial configuration
If you are in the process of restoring a server using a YunoHost backup, you should skip this step and instead restore the backup instead of the postinstall step.
You can perform the initial configuration with the web interface by typing in the address bar of your web browser the public IP address of your server. Typically, your VPS provider should have provided you with the IP of the server.
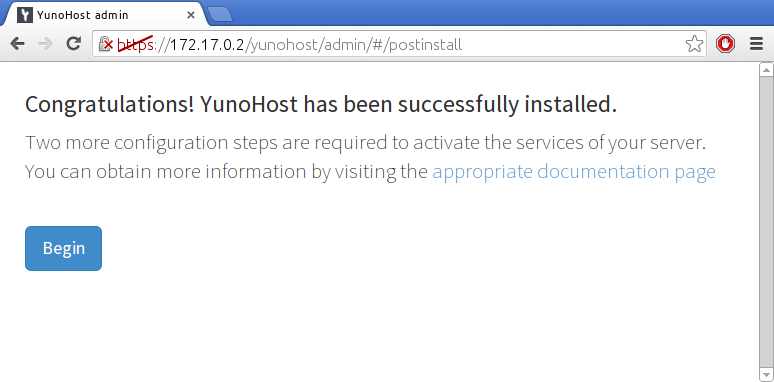
During the first visit, you will very likely encounter a security warning related to the certificate used by the server. For now, your server uses a self-signed certificate. For now, you should add a security exception to accept the current certificate. (Though, PLEASE, do not take the habit of blindly accepting this kind of security alert!)
You should then land on this page :
Main domain
This will be the domain used by your server's users to access the authentication portal. You can later add other domains, and change which one is the main domain if needed.
You will have to choose a fake domain, since it will not be accessible from outside.
For example, ynh.wsl. The tricky part is advertising this domain to your host.
Alter your C:\Windows\System32\drivers\etc\hosts file. You should have a line starting by ::1, update it or add it if needed to get:
::1 ynh.wsl localhostIf you want to create subdomains, do not forget to add them in the hosts file too:
::1 ynh.wsl subdomain.ynh.wsl localhostFirst user
Since YunoHost 11.1, the first user is now created at this stage. You should pick a username and a reasonably complex password. (We cannot stress enough that the password should be robust!) This user will be added to the Admins group, and will therefore be able to access the user portal, the web admin interface, and connect via SSH or SFTP. Admins will also receive emails sent to root@yourdomain.tld and admin@yourdomain.tld : these emails may be used to send technical informations or alerts. You can later add additional users, which you can also add to the Admins group.
This user replaces the old admin user, which some old documentation page may still refer to. In which case : just replace admin with your username.
Run the initial diagnosis
Once the postinstall is done, you should be able to actually log in the web admin interface using the credentials of the first user you just created.
Reminder: YunoHost in WSL will likely not be reachable from outside, and real domains and certificates won't be able to be assigned to it.
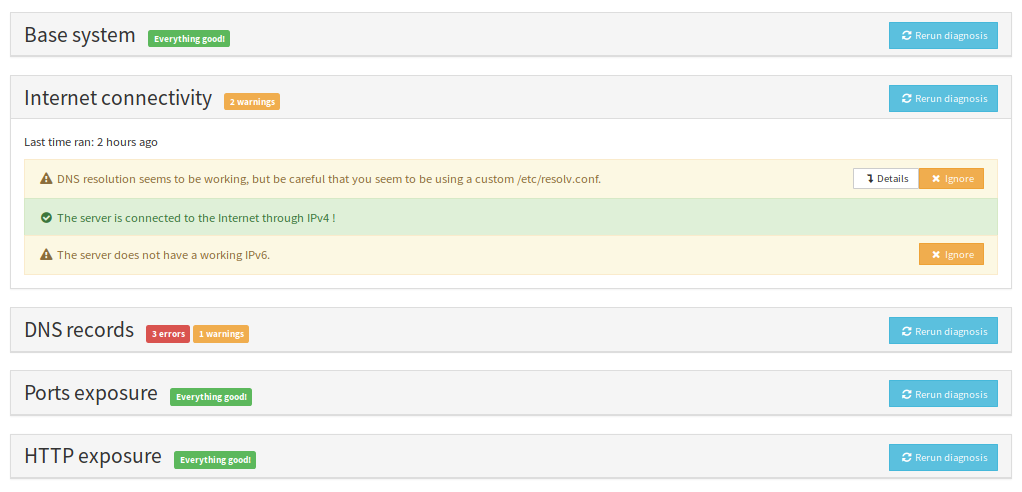
The diagnosis system is meant to provide an easy way to validate that all critical aspects of your server are properly configured - and guide you in how to fix issues. The diagnosis will run twice a day and send an alert if issues are detected.
N.B. : don't run away ! The first time you run the diagnosis, it is quite expected to see a bunch of yellow/red alerts because you typically need to configure DNS records (if not using a .nohost.me/noho.st/ynh.fr domain), add a swapfile if not enough ram .
If an alert is not relevant (for example because you don't intend on using a specific feature), it is perfectly fine to flag the issue as 'ignored' by going in the webadmin > Diagnosis, and clicking the ignore button for this specifc issue.
To run a diagnosis, go on Web Admin in the Diagnosis section. Click Run initial diagnosis and you should get a screen like this :
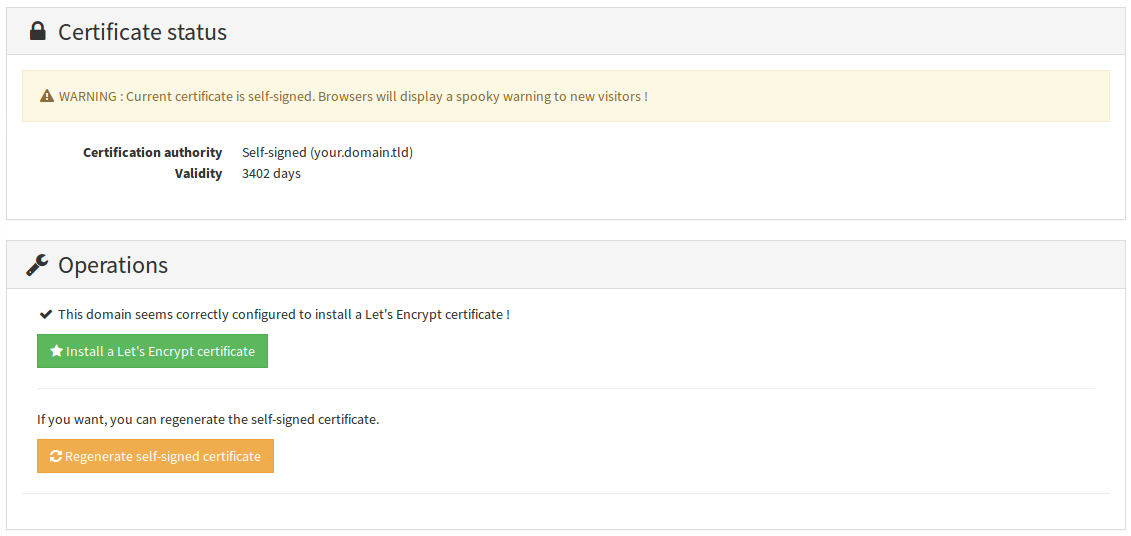
Get a Let's Encrypt certificate
Once you configured DNS records and port forwarding (if needed), you should be able to install a Let's Encrypt certificate. This will get rid of the spooky security warning from earlier for new visitors.
For more detailed instructions, or to lean more about SSL/TLS certificates, see the corresponding page here.
Go in Domains > Click on your domain > SSL Certificate
 Congratz!
You now have a pretty well configured server. If you're new to YunoHost, we recommend to have a look at the guided tour. You should also be able to install your favourite applications. Don't forget to plan backups !
Нашли ошибки? Думаете, что можете улучшить документацию? Simply click the Edit link at the top of the page, and then the icon on Github to suggest changes.