Quick Menu
Configure SMTP relay
If your ISP blocks port 25, if you can't set a reverseDNS on your server, or if you have any other troubles using the built-in SMTP server on YunoHost, you may want to setup your YunoHost server to use an SMTP relay.
What is an SMTP relay?
An SMTP relay is basically a third party hosted SMTP server that will send emails on behalf of your own SMTP server (Postfix service on YunoHost). Once setup correctly on YunoHost, its operation is transparent, both for you and for your correspondents: they will see emails as coming from your YunoHost main URL, but all the sending will be delegated to the SMTP relay you have chosen and configured.
Disadvantages of SMTP relays
It's important to note that using an SMTP relay has to be seen as a (big) compromise in the world of self-hosting. Indeed, when using an SMTP relay, not only a third party sends emails on your behalf, but it has full access to the content of all the emails you'll send and can also possibly modify them (For example, by default, MailJet rewrites the html hyperlinks contained in your emails, in order to track the activity of your correspondents). Be also aware that an SMTP relay is setup for your whole YunoHost server: you can't choose which emails or which users go through it because all future emails will.
Beyond the privacy considerations above, an SMTP relay can impose technical limitations that one would not have if port 25 was open. For example, with most relays, if a user of your YunoHost server declares an external "forwarding address" in order to automatically forward messages received on your YunoHost server to another mailbox, such forwarding will not work for emails originating from outside your server, without any warning. Indeed, relays generally require that the messages they forward have a sender address from your domain (to fight spam and preserve the reputation of their services), which is not the case for an "automatic forward" where the original sender of the mail is kept; the message is then blocked by the relay (which, normally, warns your YunoHost admin, but only afterwards)
How to use an SMTP relay with YunoHost?
YunoHost has a built-in SMTP relay configuration, available from version 4.1. That configuration is not yet available from the admin web interface, though. You will have to use the command line interface.
Step 1: Register with an SMTP relay provider
Many providers exist. Some have free plans with or without limitations, it's up to you. As written above, you have to be careful with your choice as you will basically handover all your emails to that third party. Whether you can trust it or not, that's your call!
Step 2: Setup your DNS records correctly
Once registered, the SMTP relay provider will usually ask you to modify your DNS. Standard procedure is to add a DKIM key and a SPF key to your DNS records. The way to modify these records and the value of the keys you'll have to add depend both on your domain name provider and SMTP relay provider.
Usually, the SMTP relay provider will provide you with a guide on how to modify these records, together with an automatic check tool that will tell you when your DNS have been setup correctly. That step is mandatory to prove "the world" that you, owner of your domain name, did explicitly authorize your SMTP relay provider to send emails on your behalf.
Please note that modifying your DNS records could sometimes take over 24h to take effect, so be patient!
From now on, a non trusty SMTP relay provider could send emails from your main domain without telling you.
Step 3: Setup YunoHost correctly
It can be configured either from the webadmin or the command line.
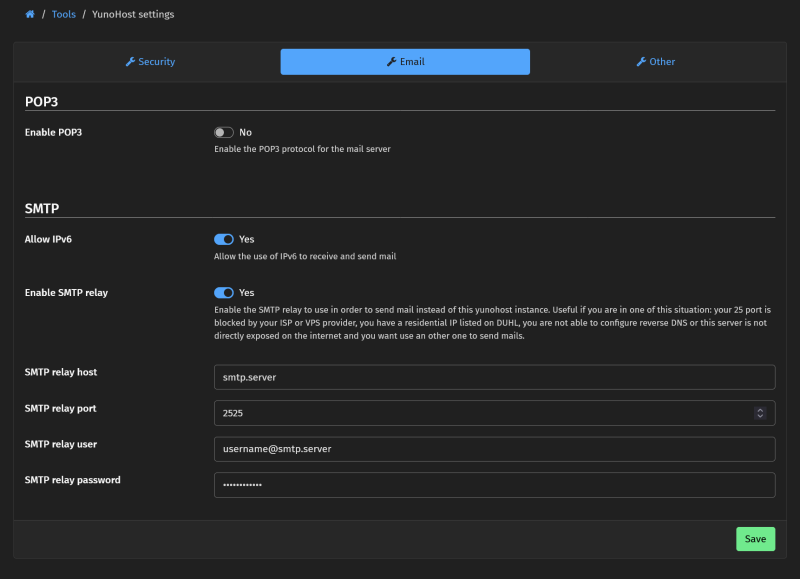
Go to your web admin, in Tools > Yunohost Settings and Email.
Now set all options requests :
- SMTP relay host : SMTP server url.
- SMTP relay port : Port use with the distant server.
- SMTP relay user : Login or identification mail server.
- SMTP relay password : Your SMTP relay password.
Password with # char won't works properly due to postfix limitation (it's possible other chars are forbidden, don't hesitate to report it to update this doc).

Your SMTP relay is now configured!
From now on, a non trusty SMTP relay provider could read or use the data of all the emails you send without telling you (but still won't be able to read nor to use the data from emails you receive).
Step 4: Check your setup
You can check your setup by sending emails and try if everything works. Some of the SMTP relay will give you insights about the emails you send so that can also be a good way to check that everythings works as needed. Of course, you can always have a try with mail-tester.com to check for any problem or discrepancy.
Found errors? Think you can improve this documentation? Simply click the Edit link at the top of the page, and then the icon on Github to suggest changes.